
If you want to take mouthwatering food photos, the right food photography equipment makes a big difference. It helps you capture the texture of a crispy pizza crust, the shine on melted chocolate, and the freshness of herbs sprinkled over pasta. Whether you’re shooting for a blog, a restaurant menu, or a brand campaign, your gear decides how real and tempting your food looks.
This guide breaks down the most important food photography equipment you need, how to choose it, and what actually matters when building your setup. You’ll learn about cameras, lenses, lighting, and useful tools that simplify your workflow.
Let’s dive in.
Food photography equipment doesn’t have to be expensive or complicated. It’s about using tools that match your skill level and shooting style. You can start with a basic camera and natural light, then upgrade as your work grows.
The three main elements of any food photography setup are:
Each of these plays a unique role in determining the outcome of your image. Good equipment enhances your creativity instead of restricting it.
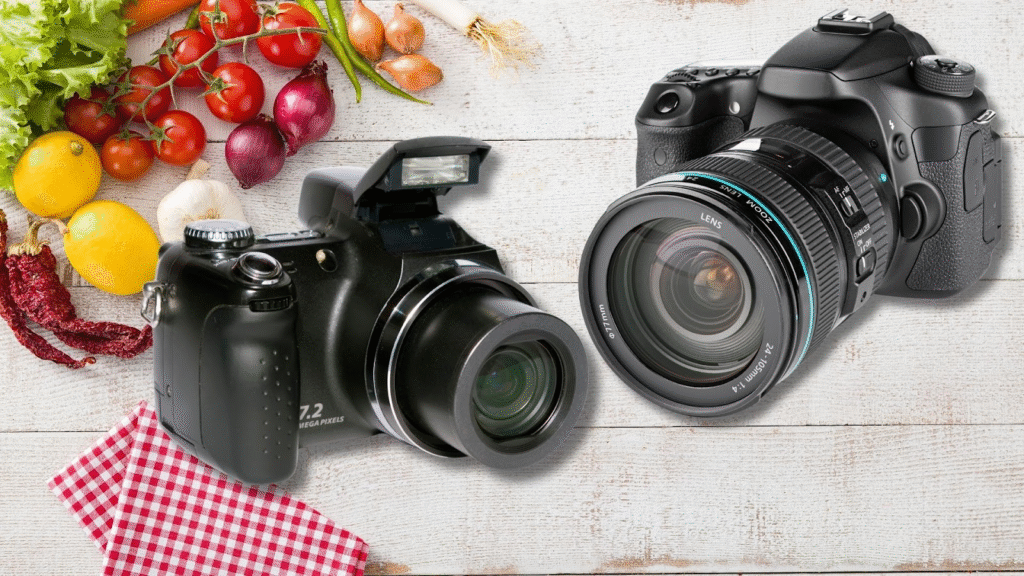
The camera is the heart of your food photography equipment. But buying the most expensive one doesn’t automatically mean better results. What matters is image quality, color accuracy, and how comfortable you are using it.
If you’re just starting, a mid-range DSLR or mirrorless camera is perfect. Both offer manual controls and high-resolution images, which are essential for editing and printing.
Mirrorless cameras are compact and quiet, which makes them great for shooting in restaurants or small studios. DSLRs have longer battery life and more lens options, ideal for professional setups.
Look for cameras with:
Popular options include the Canon EOS R series, Nikon Z series, and Sony Alpha models. These cameras are known for sharp images and true-to-life colors, which are key in food photography.
Lenses define how your image looks. They affect focus, depth, and background blur. In fact, many professionals say lenses matter more than the camera body when it comes to food photography equipment.
A 50mm lens is the classic choice for beginners. It gives a natural perspective and sharp results. For close-up shots that highlight details like sugar crystals or steam, a 100mm macro lens is perfect. It captures textures beautifully and lets you get close without distortion.
If you shoot overhead tablescapes, a 35mm lens works better. It fits more elements in the frame while keeping lines straight.
So, to summarize:
When buying a lens, focus on aperture. Lenses with f/1.8 or f/2.8 apertures let in more light and create a soft background blur that makes the dish stand out.
Camera filters might seem unnecessary, but they add control to your images. A polarizing filter reduces reflections on shiny surfaces like plates or glasses. Neutral density filters help when shooting with wide apertures in bright light, giving you smoother backgrounds without overexposure.
Filters are small tools that can dramatically change the final look of your food photo.
When shooting close-ups or stacking images for focus, even a small shake can blur your image. A remote shutter or wireless trigger removes that risk. Some cameras have built-in timers, but remote triggers are faster and more precise.
They also help when shooting from a tripod or while adjusting props mid-shot.

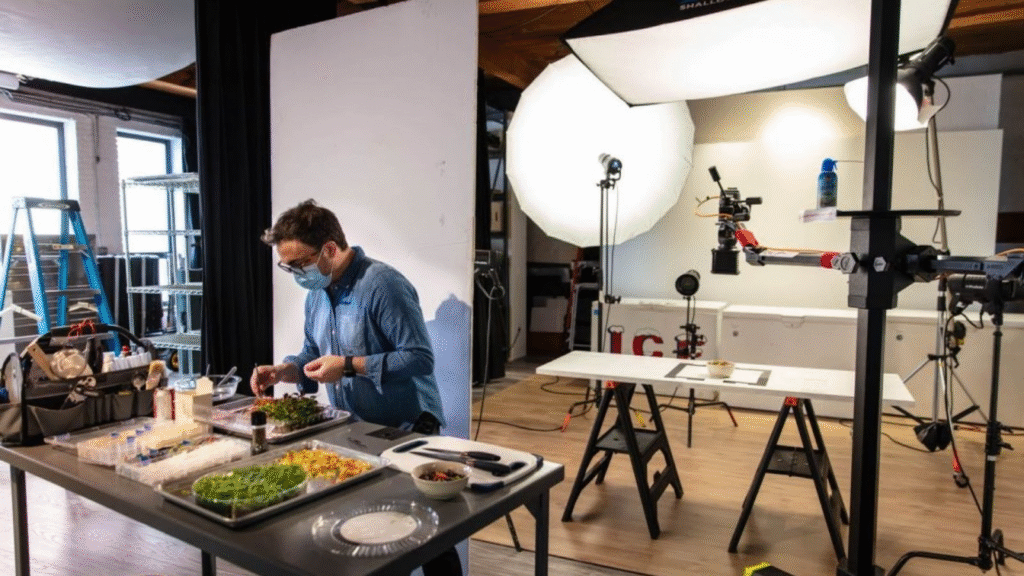
Lighting is what separates amateur photos from professional ones. It defines mood, texture, and color. Natural light is always a great start, but artificial lighting gives you control in any condition.
When building your food photography equipment kit, include at least one reliable light source. Softboxes or LED panels are ideal for beginners. They provide consistent light without harsh shadows.
Position your light at an angle instead of directly above or in front of the food. This creates depth and highlights texture. For softer shadows, use diffusers like white curtains or translucent paper.
Reflectors are another essential tool. They bounce light back onto the food, brightening dark areas without extra lamps. You can use professional reflectors or even a white foam board for the same effect.
If you’re photographing beverages or glossy dishes, try backlighting. It emphasizes transparency and shine, making drinks look fresh and appetizing.
Professional food photographers often rely on artificial lighting because it ensures the same results no matter the time of day. Studio strobes and continuous LED panels are the most common choices.
Strobes provide strong, controlled bursts of light. They freeze motion and highlight textures like melting cheese or dripping sauces. You can pair strobes with softboxes or diffusers to adjust light intensity and spread.
LED lights are easier to use and show you how the light falls before taking the shot. They come in variable color temperatures, so you can match them with natural light or create a custom mood.
Always look for lights with high CRI (Color Rendering Index). A CRI above 90 ensures colors appear natural and accurate, which is vital when photographing food.
Stands and boom arms are crucial when positioning lights overhead or from the side. They keep your lighting consistent and allow flexibility in angle and height. A C-stand is the industry standard because it’s sturdy and adjustable.
A boom arm helps position light above the food, creating depth without harsh reflections. For small studios, a compact, foldable stand is ideal.
Reflectors bounce light onto the food, while flags block it. Both are essential parts of professional food photography equipment. Use a white reflector to brighten shadows and a black flag to reduce unwanted glare.
You can even combine them. For example, position a black card behind a shiny plate to absorb reflections and make the dish pop.
Tripods are underrated but critical food photography equipment. They help you shoot from consistent angles, especially when styling multiple elements in a frame. They also prevent camera shake during long exposures or when using low light.
Choose a sturdy tripod with adjustable height and a ball head for easy positioning. Carbon fiber tripods are lightweight yet stable, ideal for both studio and on-location shoots.
Using a tripod also lets you keep your hands free for adjusting props or adding finishing touches to the food.
Props bring life to food photography. They set the scene and create context for your dish. The trick is to choose props that support the main subject instead of distracting from it.
Common props include plates, napkins, cutlery, cutting boards, and fabric textures. Neutral colors and matte finishes work best since they don’t reflect light.
When building your food photography equipment collection, invest in a few quality backgrounds. Wooden boards, stone slabs, and textured fabrics add visual interest. You can also use printed vinyl backdrops that mimic real surfaces while saving space.
Keep your style consistent. If you prefer minimal photography, choose simple plates and clean lines. For rustic food, use earthy tones and vintage items.
Light modifiers control how your light behaves. Diffusers soften the light, while reflectors redirect it. These tools are vital parts of food photography equipment for creating balanced lighting.
You can buy softboxes, umbrellas, or diffusion panels. If you’re on a budget, DIY options like white fabric or parchment paper work surprisingly well.
For directional light, use a grid or snoot. They focus light on specific areas, ideal for dramatic effects or highlighting steam.
When shooting professionally, connecting your camera to a laptop or monitor can save time. This process, called tethering, helps you see your photos in real-time. You can check focus, composition, and exposure without relying on the small camera screen.
Tethering software like Capture One or Adobe Lightroom integrates with most cameras. They also allow quick adjustments during the shoot, which makes the workflow smoother.
If you’re serious about building a food photography business, tethering is worth adding to your equipment list.
If you shoot regularly, having a dedicated space saves time. You don’t need a huge studio. Even a small room or corner can work if organized properly.
Start by controlling light. Use curtains or blackout panels to eliminate unwanted reflections. Keep your backgrounds and props nearby so you can experiment quickly.
Invest in storage bins for utensils, linens, and boards. Label everything to make your setup efficient. A clean, organized space helps you focus on creativity instead of setup struggles.
A good shooting table is another key piece of food photography equipment. Look for one that adjusts in height and supports heavy dishes or props. Pair it with a backdrop stand so you can easily change scenes.
Keep a small fan or air blower handy for creating movement in the shot, like steam or flying herbs.
Food styling tools bridge the gap between photography and art. They help your dish look perfect under the lens.
Tweezers, brushes, droppers, and spray bottles are common items in a stylist’s toolkit. You can use brushes to add oil for shine, tweezers to place garnishes precisely, and spray bottles to create fresh condensation on drinks.
Cotton swabs and paper towels help clean plates and props before shooting. These simple tools make your work more professional.
A lazy Susan or rotating platform also helps when adjusting angles without disturbing the setup.
The right food photography equipment helps you control composition. A top-down tripod arm or overhead rig lets you capture flat lays without distortion. This is ideal for table spreads, recipe boards, or product shots.
If you shoot handheld, use camera straps that reduce fatigue during long sessions. They also prevent accidental drops.
Some photographers use grid overlays on tethered monitors to align elements accurately. This ensures a consistent layout, especially for brand campaigns or menus.
Color accuracy is non-negotiable in food photography. The wrong tone can make a dish look dull or unappetizing. A color checker card is a small but powerful part of your food photography equipment.
You photograph it before shooting your scene, then use it in editing to correct tones. It guarantees that whites are neutral, greens are true, and reds stay natural.
White balance cards and gray cards work similarly. They help calibrate your lighting for consistent results across sessions.
Food photography sessions produce large files, especially when shooting in RAW. Reliable storage is essential. External hard drives and SSDs keep your data safe and speed up editing.
Use folders to organize your projects by date or client name. Back everything up on cloud storage for extra security.
A tethered setup, as mentioned earlier, helps you transfer and view files instantly. It reduces mistakes and saves editing time later.

Your gear lasts longer when maintained properly. Always clean lenses with microfiber cloths and store them in dry environments. Moisture can cause fungus on the lens glass, especially in humid climates.
Use air blowers to remove dust from camera sensors. For lighting gear, check cables and bulbs regularly.
Keep your props organized to prevent scratches or stains. If you use wooden boards or utensils, treat them with food-safe oil to preserve texture.
Proper care ensures your food photography equipment stays reliable for years.
You don’t need to buy everything at once. Build your collection gradually based on your needs. Start with a good camera, one versatile lens, and natural light. Then add lighting, tripods, and props as your projects expand.
If you’re short on budget, consider buying second-hand gear from trusted stores or renting for specific shoots. This lets you test different tools without long-term investment.
Prioritize quality over quantity. A few reliable pieces of equipment will serve you better than a large collection of mediocre ones.
Many beginners make the mistake of focusing on gear before learning technique. Expensive food photography equipment can’t fix poor composition or lighting.
Avoid buying unnecessary gadgets that you rarely use. Instead, invest in learning how to make the most of what you have.
Another mistake is mixing lighting types. Combining daylight with artificial light can create inconsistent color tones. Stick to one lighting source during a session.
Finally, always test your setup before shooting a full series. A quick test shot helps you catch exposure or focus issues early.
Post-processing brings everything together. Even with the best food photography equipment, your photos need fine-tuning. Editing helps you control exposure, contrast, and color balance.
If editing feels time-consuming, you can outsource it to professionals. This is where aitinsider can help.
At aitinsider, we provide specialized image editing services for food photographers, bloggers, and businesses. Our team enhances your images while keeping them natural and appetizing. We handle color correction, retouching, and background cleanup so you can focus on creativity.
We understand the importance of visual consistency in food photography. That’s why our service ensures every image aligns with your brand’s style and purpose.
Whether you’re working with clients or managing your own blog, aitinsider saves you time and effort.
Even with perfect lighting and composition, editing refines your images. Software like Adobe Lightroom and Photoshop helps adjust exposure, color, and sharpness.
Editing brings your vision to life. It lets you enhance details, balance tones, and maintain a consistent style across your portfolio.
However, editing takes time and skill. If you shoot regularly for clients or brands, outsourcing post-production can be more efficient.
That’s where professional editing services like aitinsider come in.
At aitinsider, we specialize in image editing for photographers, food bloggers, and creative studios. Our team ensures your food photos look sharp, vibrant, and ready for publication. Whether you need color correction, background cleanup, or retouching, we help you deliver professional results without wasting hours on editing.
Mastering food photography equipment is about balance. It’s not about owning everything, but knowing how to use what you have to tell a visual story. Start with a reliable camera and lens. Learn lighting. Then gradually expand into tools that help refine your craft.
Great photos don’t just come from expensive gear. They come from understanding how light, texture, and color work together.
Your food deserves to look as good as it tastes. With the right setup, you can achieve that every time.
And when you’re ready to give your photos a professional finish, visit aitinsider. Our expert image editing team will help your work stand out with clean, vibrant, and natural results.
Food Photography Online Course | Learn To Shoot Delicious Photos From Home
[…] you’re hands-on, look for a Food Photography Online Course that gives assignments, feedback, or community critique. These courses mimic […]
Best Lens For Food Photography – Capture Tasty Shots
[…] good news? Every mistake teaches you something. Food photography is all about patience and practice. Over time, your eye for detail improves, and your photos start […]