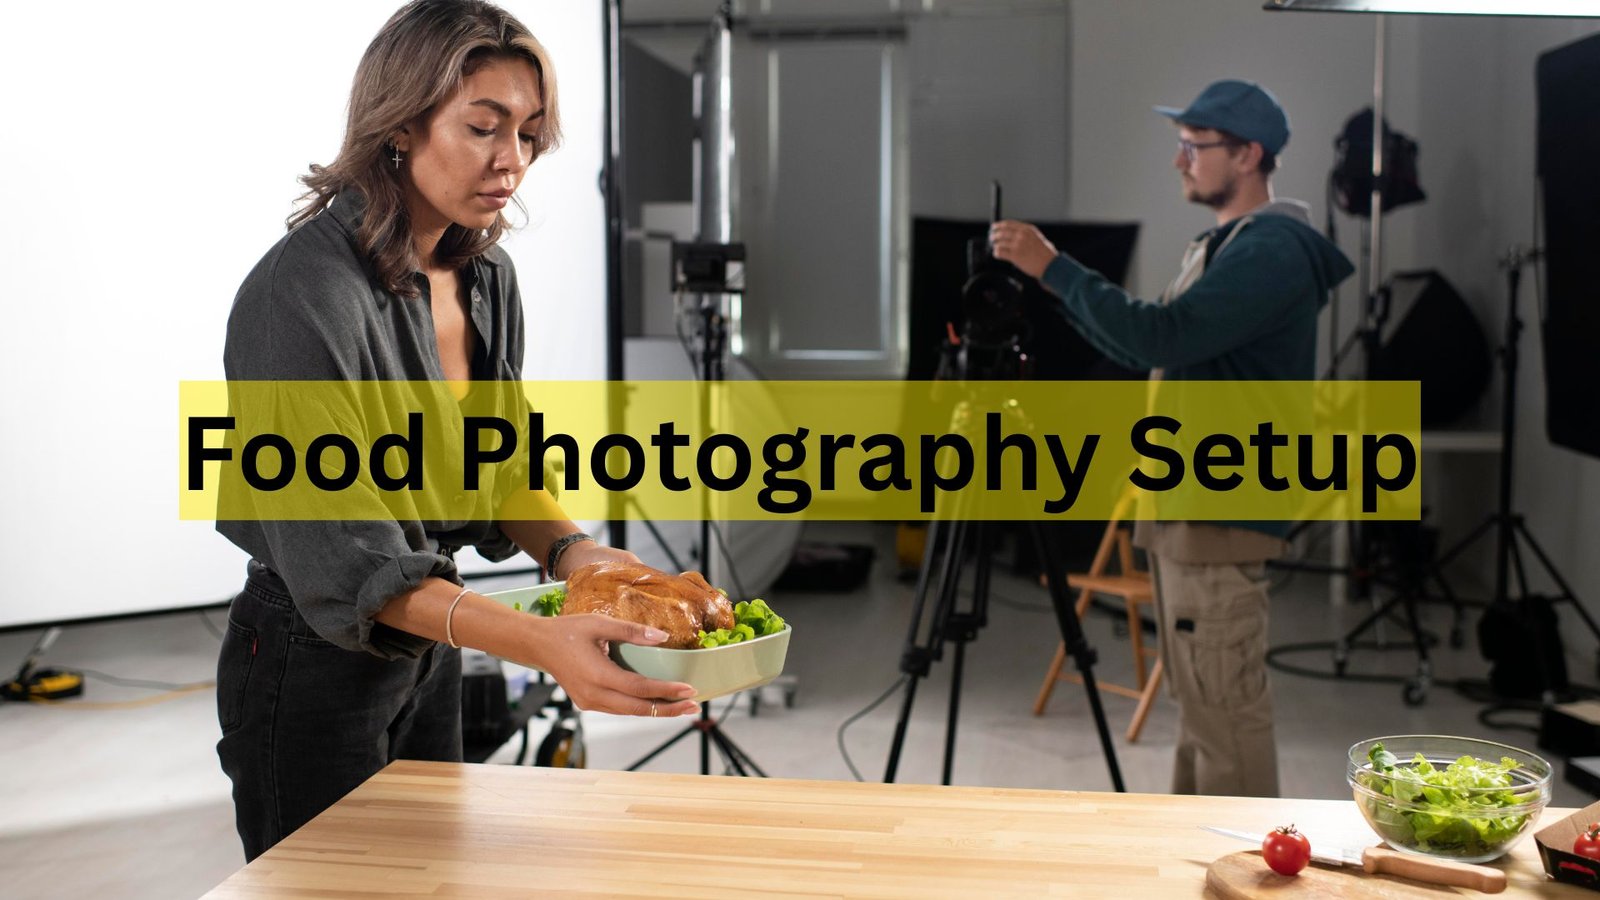
Food photography is more than just snapping pictures of delicious dishes – it’s about creating a visual story that makes viewers crave what they see. Whether you’re a food blogger, restaurant owner, or social media creator, having the perfect food photography setup can transform your photos from average to stunning. A well-planned setup doesn’t just depend on expensive equipment – it’s about mastering lighting, composition, background, and styling.
In this article, we’ll dive deep into advanced food photography setup tips that can help you bring your culinary creations to life. You’ll learn how professionals build their setups, the secrets behind mouthwatering food styling, and how you can create your own studio setup – even from home.
Before diving into techniques, it’s important to understand why a food photography setup matters so much. Great food photos aren’t an accident – they are a result of planning and attention to detail. The setup acts as the foundation that supports every creative decision you make – from the direction of the light to the choice of props.
Think of it this way: your setup tells your food’s story. A rustic wooden table might give off cozy, homemade vibes, while a sleek marble background says modern and luxurious. The goal is to align the visual tone with the food’s identity. If you’re photographing artisanal bread, for example, you might use natural light and earthy props. For a fine-dining dessert, you’d likely go with clean lighting and minimalist backgrounds.
Lighting is the single most important factor in your food photography setup. Even the most beautifully styled dish can look dull or unappetizing under poor lighting. Professional food photographers often say, “Light is the ingredient that makes everything look delicious.”
For the best results, aim for soft, diffused lighting. Natural light from a large window is ideal because it produces gentle shadows and realistic tones. However, when shooting indoors or at night, you’ll need artificial lighting. Use continuous LED lights or strobes with diffusers to simulate natural light. Position your main light at a 45-degree angle to the food, and use white reflectors to bounce light back onto the darker areas.
Avoid using direct overhead lighting – it can create harsh shadows and make textures disappear. Instead, experiment with side lighting or backlighting. Side lighting emphasizes texture and depth, especially when shooting dishes like pasta, pastries, or salads. Backlighting, on the other hand, highlights the shine and translucence of foods like soups, beverages, and desserts with glossy surfaces.
To maintain consistency, keep your light source steady and use light modifiers like softboxes or diffusion sheets. This helps create that smooth, glowing look that’s so popular on food blogs and magazines.
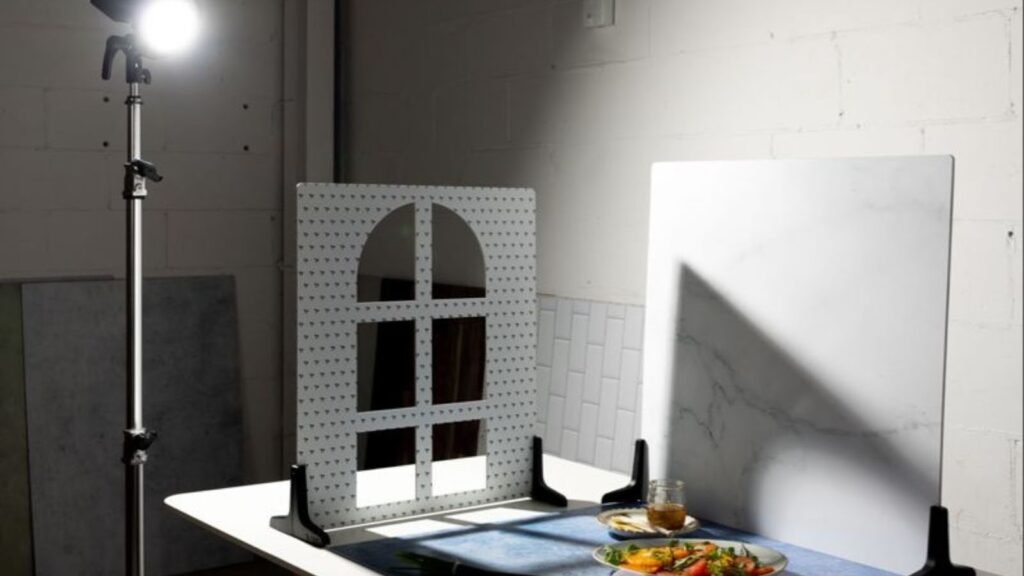
Your background and surface play an essential role in the overall food photography setup. They act as the stage on which your food takes the spotlight. When choosing backgrounds, consider texture, color, and contrast.
Wooden boards, marble slabs, ceramic tiles, and matte paper backdrops are all excellent choices. Each has a unique personality – wood adds warmth, marble gives elegance, and neutral tones help food colors pop.
It’s wise to invest in a few versatile backgrounds that you can mix and match. Avoid glossy or reflective materials unless you’re going for a specific stylistic effect. The goal is to complement the food, not compete with it.
A quick tip: keep your surfaces clean but not sterile. Small imperfections like crumbs or droplets can add realism and life to your composition.
A strong food photography setup is incomplete without thoughtful composition. Composition is how you arrange the elements in your frame to guide the viewer’s eye. It’s where creativity truly shines.
Start by deciding the hero of your shot – the main subject – and build around it. Use the rule of thirds to place your food slightly off-center for a more dynamic image. Play with leading lines, props, and utensils that naturally draw attention toward the main dish.
Experiment with angles. The most common ones in food photography are:
Remember that composition is storytelling. Every element – from props to garnish – should add context or emotion to your image.
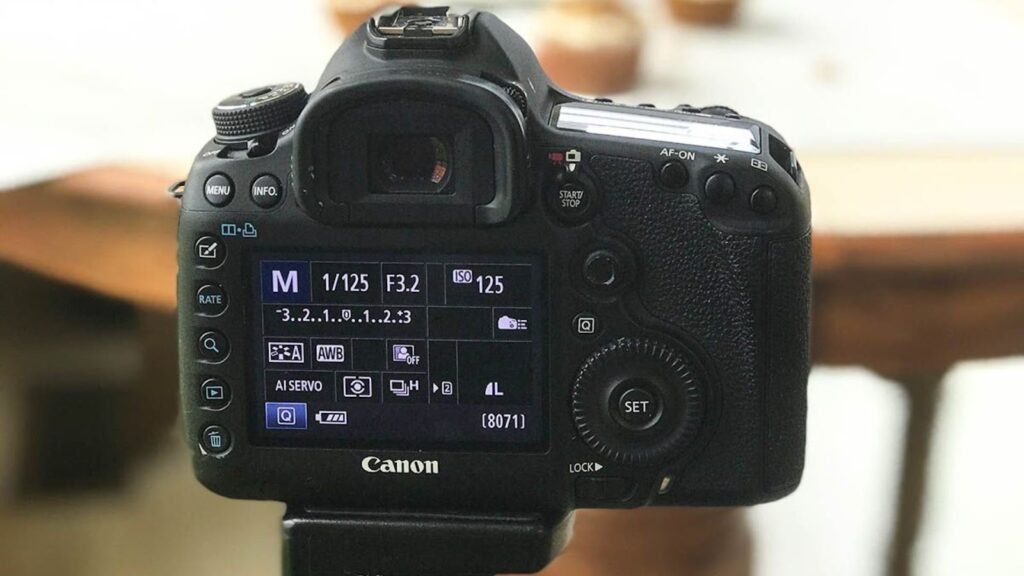
Now, let’s get technical. Your camera settings can make or break your photos. While automatic mode might work for casual shots, mastering manual settings gives you full creative control.
Use a wide aperture (like f/2.8 to f/4) to create a shallow depth of field that blurs the background and keeps the food in focus. This adds that dreamy, professional look. However, if you’re photographing a flat layout or a table scene, go for a smaller aperture (f/8 or higher) to keep everything sharp.
Set your ISO as low as possible – ideally between 100 and 400 – to avoid noise. Adjust your shutter speed to prevent motion blur, especially if you’re shooting handheld. If the lighting is low, use a tripod to stabilize your camera.
For color accuracy, always shoot in RAW format. It gives you more flexibility when editing exposure, white balance, and tones later.
Your food photography setup comes to life with props and styling. Props tell a story and add context to your food. But here’s the secret – less is often more. Too many props can distract from the dish.
Choose items that match your theme. Rustic wooden spoons, linen napkins, and stoneware bowls create a cozy, organic feel. Sleek glassware and minimal cutlery give off a fine-dining aesthetic. Always choose colors that complement the food – not clash with it.
When it comes to food styling, think of how textures and colors interact. Use garnishes strategically to add contrast – a sprinkle of herbs, a drizzle of sauce, or a dusting of sugar can make all the difference.
One overlooked aspect of styling is portion size. Smaller portions often look better on camera because they leave space for air and balance within the frame. Don’t be afraid to manipulate the food slightly to make it more photogenic – for example, brushing oil on grilled vegetables to add shine or stacking pancakes slightly askew for a natural look.
There’s a constant debate among photographers – should you use natural light or artificial light in your food photography setup? The truth is, both have their place.
Natural light is soft, flattering, and free. It’s ideal for lifestyle or daylight shots. However, it changes throughout the day and can be unpredictable. Artificial light, on the other hand, gives you control. You can shoot anytime, replicate consistent lighting, and fine-tune shadows using modifiers.
If you use artificial lights, choose daylight-balanced LEDs or strobes. Pair them with softboxes or diffusion panels to create even lighting. Experiment with color gels or white balance adjustments to achieve the mood you want – warm for cozy home meals, cool for fresh salads or cocktails.
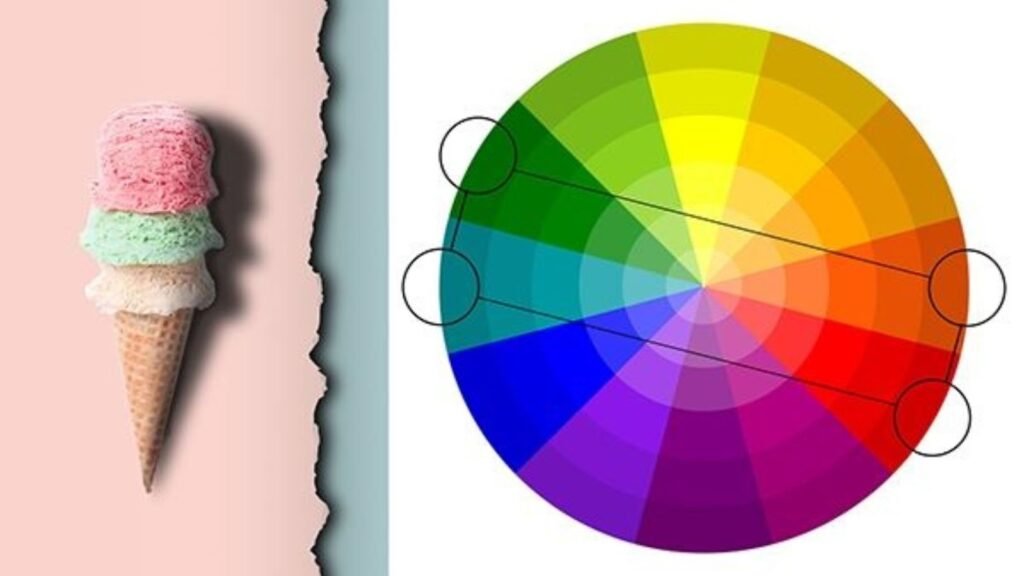
Color plays a subtle but powerful role in your food photography setup. The right palette can evoke emotion and enhance appetite appeal. Warm tones like orange, brown, and red create comfort and coziness – great for soups, baked goods, and comfort food. Cool tones like blue and green give a sense of freshness – perfect for salads, fruits, and beverages.
When styling, use complementary colors (opposites on the color wheel) to make your dishes pop. For instance, red strawberries against a green mint background look visually striking.
The mood you create depends largely on how you balance colors, props, and lighting. Want something airy and cheerful? Use bright light, neutral props, and soft shadows. Going for a moody, dramatic look? Reduce light intensity, use darker surfaces, and let shadows tell the story.
Even the best raw photos benefit from a little post-processing. Editing brings your vision to life. Adjust exposure, contrast, and white balance to achieve natural-looking tones. Sharpen details slightly, but don’t overdo it. The goal is realism, not artificial perfection.
You can use editing tools like Adobe Lightroom or Capture One for color correction and fine-tuning. Pay attention to highlights and shadows – they define the mood of your image. Use selective adjustments to brighten specific areas of the food that need to stand out.
For background cleanup or object removal, tools like Photoshop can help. And if you ever need expert help making your images look professional, check out aitinsider – we provide top-tier image editing services designed specifically for photographers, food bloggers, and creative businesses.
If you want to create consistently high-quality photos, having a dedicated space for your food photography setup is a game-changer. You don’t need a massive studio – even a small room or corner near a large window can become your creative zone.
Start by identifying your main light source. If you rely on natural light, position your shooting table near a north- or east-facing window to get soft, even light throughout the day. Use white curtains or diffusion sheets to control harsh sunlight.
For artificial setups, organize your lights, reflectors, and diffusers in a way that lets you move freely around the scene. Keep your backdrop stands, tripods, and light modifiers within easy reach. A clutter-free space keeps your workflow efficient and your creativity flowing.
You can use modular setups with rolling tables or adjustable stands. This makes it easier to switch between flat lays, side shots, and overhead shots without dismantling your entire arrangement.
Label your props and backdrops to save time when switching scenes. Small organizational habits can make a huge difference, especially when shooting multiple recipes or commercial projects in one day.
Once your food photography setup is in place, building a consistent workflow ensures your shoots run smoothly. Here’s how professionals approach it – not as a strict formula, but as a creative rhythm.
Start with pre-production planning. Before shooting, visualize your scene. Sketch out compositions or create a mood board. Decide on the color palette, lighting direction, and type of background you’ll use. This helps you stay consistent with your brand or client’s aesthetic.
During the shoot, always tether your camera to a laptop or monitor using software like Lightroom, Capture One, or Canon EOS Utility. This lets you see your images in real time and make instant adjustments to lighting, focus, or props.
After capturing your images, back them up immediately. Use an external hard drive or cloud service. Editing comes next – this is where you bring out the best in your shots. Make sure your editing style aligns with your overall theme so your photos look cohesive across your portfolio or Instagram feed.
Finally, export your images in different resolutions – one for web use, another for print. Organize your files by project or client name to make retrieval easier in the future.
Styling food for photography is an art that goes beyond aesthetics – it’s about making the food look fresh, vibrant, and delicious on camera. But the challenge is that food doesn’t always cooperate. That’s where some clever food photography setup tricks come in handy.
For instance, ice cream melts too quickly under studio lights. Professionals often use mashed potatoes dyed with food coloring to mimic ice cream texture. Similarly, using motor oil instead of syrup for pancakes or adding a touch of glycerin to drinks keeps them glossy for longer.
If you’re shooting hot dishes, keep a small steamer nearby to recreate steam for that “fresh from the oven” look. Spray a light mist of water or oil on fruits and vegetables to make them appear freshly washed.
For soups or stews, use inverted bowls underneath the liquid to raise ingredients to the surface. This prevents everything from sinking to the bottom.
Of course, the goal isn’t to deceive – it’s to present your food in its best light while maintaining authenticity. Use these tricks carefully to highlight the beauty of your dish, not to misrepresent it.
The magic of a professional food photography setup often lies in its visual depth. Flat images fail to capture the richness of real food, but depth and layering bring it to life.
Start by playing with foreground, middle ground, and background elements. Add small details, such as cutlery, herbs, or crumbs, in the foreground to give your image a sense of realism. Use props strategically to guide the eye through the composition, rather than cluttering it.
Texture is another critical element. Combining different textures – glossy sauces, rough linens, flaky pastries – creates contrast and makes the image more engaging. Lighting plays a huge role here, too. Side lighting or angled backlighting helps highlight texture beautifully.
Remember, the more dimensions your image has, the more lifelike and mouthwatering it appears.
In post-production, one of the most powerful tools for enhancing your food photography setup results is color grading. This is where you fine-tune hues and tones to set a specific mood.
Start by ensuring your white balance is accurate. Then, adjust saturation and luminance carefully – too much can make food look unnatural, while too little can make it dull.
Warm tones tend to make food look more inviting. A slight golden tint works wonders for bakery and comfort dishes. Cooler tones are better for clean, fresh foods like salads, seafood, and smoothies.
You can also use split toning to give highlights and shadows a specific color cast. For instance, adding a bit of warm tone to the highlights and a subtle cool tint to shadows can create a cinematic look that stands out online.
For consistency, consider creating your own Lightroom presets. This helps you maintain a recognizable style across all your food photography.
If you’re shooting professionally, your food photography setup needs to align with your client’s brand identity. A local bakery might want cozy, golden lighting, while a modern restaurant might prefer clean, minimalist visuals.
Always discuss visual preferences before the shoot. Ask questions about the color palette, mood, and target audience. Once you have a clear idea, build your setup around that vision.
Bring versatility to the table – both figuratively and literally. Be ready to switch between lighting styles, backgrounds, and compositions quickly. Clients appreciate photographers who can adapt their setup efficiently.
And always keep backup gear – spare memory cards, batteries, and even reflectors. Professional reliability often makes the biggest difference in securing repeat clients.
Even experienced photographers can make errors that affect the quality of their food photography setup. One of the biggest mistakes is poor lighting balance. Overexposed highlights or deep shadows can ruin textures. Always check your histogram to ensure even exposure.
Another mistake is overstyling – using too many props or clashing colors that distract from the main subject. Keep your frame balanced and focused on the hero dish.
Avoid editing too heavily. Oversaturation, unrealistic contrasts, and unnatural sharpness can make food look unappealing. Always aim for authenticity.
Finally, don’t rush. Take time to adjust lighting, tweak props, and check focus. The best shots often come from patience and attention to small details.
Your food photography setup should evolve with your brand. Consistency builds trust and recognition. When your audience sees your photos, they should instantly know it’s yours – whether it’s from your lighting style, color palette, or composition.
Create a brand mood board to guide your creative direction. Use similar tones, props, and textures across your portfolio. This not only strengthens your identity but also helps attract the right audience and clients who appreciate your aesthetic.
If you publish on platforms like Instagram or Pinterest, consistency is everything. The algorithm rewards cohesive content, and viewers tend to follow creators who have a clear and appealing visual identity.
Editing can be time-consuming, especially when managing multiple projects or running a business. Many photographers outsource part of their editing to professionals who specialize in image enhancement.
That’s where expert help from aitinsider comes in. Our team provides high-quality image editing services tailored for food photographers and content creators. Whether you need color correction, background cleanup, or full retouching, we handle the technical side so you can focus on your creativity.
A professional retouch not only saves time but also gives your photos a refined, publication-ready finish that sets you apart in a crowded digital space.
Technology and trends evolve fast. To keep your food photography setup relevant, stay updated with new tools and techniques. Mirrorless cameras, color-calibrated monitors, and LED lighting systems are transforming how photographers work.
AI-powered editing tools are also becoming more advanced, allowing for faster workflow automation and smarter adjustments. Embracing these innovations keeps you competitive and efficient.
Moreover, storytelling is becoming increasingly important in food content. Instead of just photographing a single dish, consider creating a narrative-based photo series that shows the process – ingredients, preparation, and final presentation. This adds emotional depth and connects with your audience on a human level.
A professional food photography setup isn’t about owning the most expensive gear – it’s about creativity, precision, and storytelling. When you master lighting, styling, and composition, every meal becomes a work of art.
Take your time to experiment, refine, and develop your own signature style. Don’t be afraid to mix natural and artificial light, play with textures, or try unconventional angles. Photography, after all, is an art form – and food is one of the most beautiful subjects to capture.
And when you’re ready to take your visuals to the next level, remember that aitinsider is here to help with professional image editing, background removal, and retouching services designed for creative professionals like you. Let’s make your photos as stunning as the food you create!
Creative Food Photography Ideas & Styling Tips 2025
[…] tells the viewer where to look. The classic rule of thirds helps, but creative food photography is also about breaking rules intelligently. Try overhead shots for flat-lay stories- perfect for […]
Food Photography Services – Professional Food Images | Aitinsider
[…] where Food Photography Services make all the difference. Professional photographers know how to showcase your food in ways […]
Food Photography Studio – Capture Delicious Perfection | Aitinsider
[…] just see a product – they imagine the taste, the smell, and the experience. A professional Food Photography Studio captures this emotional connection. It turns your dishes into mouthwatering stories that […]