
In today’s real estate market, aerial photography has become a game-changer. Buyers want to see the property from every angle, including a bird’s-eye view of the home, yard, and neighborhood. Professional drone photography can highlight features that traditional photography cannot, making listings more attractive and competitive. This is where real estate drone photography tips come into play. Learning how to capture stunning aerial images can significantly boost engagement with your property listings and create a lasting impression on potential buyers.
Whether you are a real estate agent, photographer, or property owner, understanding the fundamentals of drone photography helps you make the most of your equipment and present properties in the best possible light. In this article, we will cover everything from choosing the right drone to planning flights, capturing images, and editing them professionally.
Why Drone Photography Matters in Real Estate
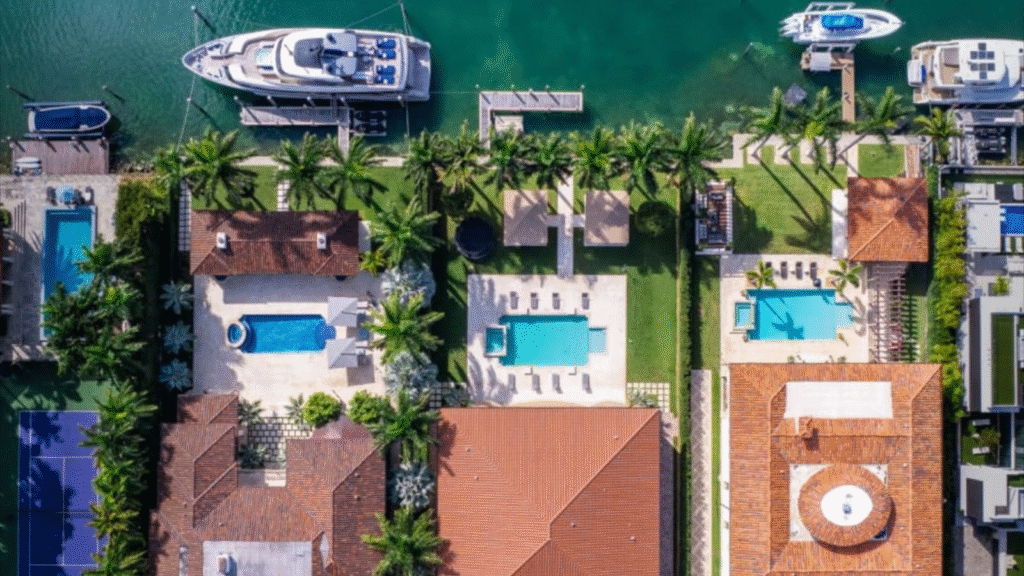
Drone photography provides a unique perspective that conventional photography cannot match. In Phoenix, or any bustling real estate market, showcasing the layout, outdoor features, and surrounding areas can set a property apart. Buyers often browse listings online first, and high-quality aerial images can attract more clicks, more showings, and ultimately more offers.
Professional drone shots demonstrate a property’s size, shape, and features clearly. They highlight landscaping, swimming pools, driveways, and even proximity to parks or community amenities. Using real estate drone photography tips ensures that you capture the property accurately while creating visually compelling images that evoke interest.
Additionally, drone photography enhances branding. Agents and photographers who offer aerial views convey professionalism, innovation, and a commitment to marketing properties effectively.
Choosing the Right Drone for Real Estate Photography
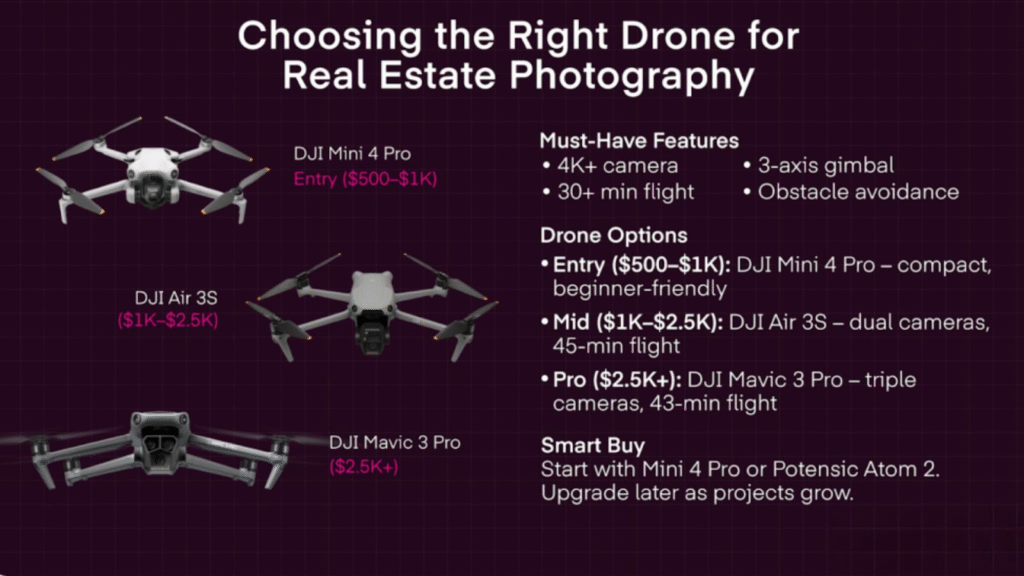
Before taking to the skies, selecting the right drone is crucial. Not all drones are created equal, and some are better suited for real estate photography than others. Look for drones with high-resolution cameras, stable flight capabilities, and GPS-assisted features that make capturing smooth shots easier.
A drone with a camera that shoots at least 12 megapixels ensures that images remain sharp, even after cropping or zooming. Gimbal stabilization is essential for minimizing shake and creating professional-looking photos. Drones with obstacle avoidance and return-to-home features increase safety and reduce the risk of accidents during flights.
Battery life and portability are also important considerations. Real estate shoots often require multiple flights around a property, so having extra batteries ensures uninterrupted coverage. Lightweight drones are easier to transport between properties, making your workflow more efficient.
By following real estate drone photography tips, you can select a drone that suits both your technical needs and your business goals.
Understanding Local Drone Laws and Regulations
Safety and compliance are critical in real estate drone photography. Most countries, including the United States, have strict regulations governing drone usage. In the U.S., for example, the Federal Aviation Administration (FAA) requires commercial drone operators to hold a Part 107 license. This ensures that operators understand flight rules, airspace restrictions, and safety protocols.
Before flying, check local regulations in your city or county. Some areas have restrictions on drone use near airports, schools, or private properties. Using real estate drone photography tips responsibly means obtaining any necessary permissions and respecting privacy laws. Not only does this prevent fines and legal issues, but it also demonstrates professionalism to your clients.
Insurance is another consideration. Liability insurance protects you if accidents occur during flights. Many professional drone photographers include coverage as part of their service, which reassures clients and protects your business.
Planning Your Drone Flight
Preparation is key to capturing breathtaking aerial images. Start by evaluating the property and deciding which areas deserve focus. Look for outdoor features like pools, patios, gardens, or unique architectural elements. Mapping your flight path in advance ensures you capture every critical angle efficiently.
Time of day affects the quality of light in your photos. Early morning and late afternoon, during the “golden hour,” provide soft, warm lighting that enhances textures and colors. Midday sunlight can produce harsh shadows, which may require editing or additional planning.
The weather is another factor to consider. Avoid flying in high winds, rain, or extreme heat, as these conditions can affect drone stability and safety. Clear skies with mild sunlight generally produce the most visually appealing images.
By following real estate drone photography tips, you ensure each flight is strategic, safe, and results in high-quality images that showcase the property effectively.
Capturing Stunning Aerial Images
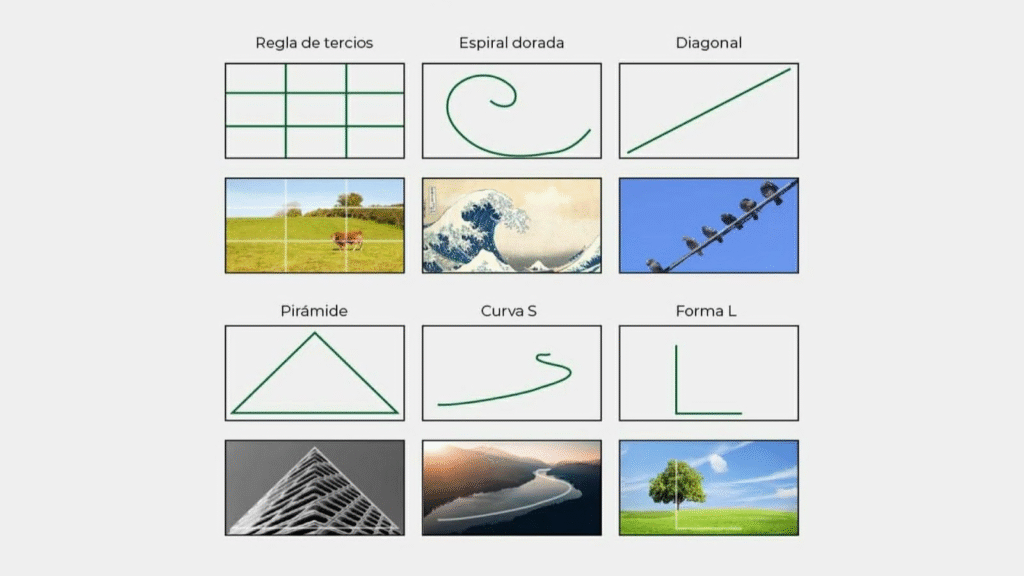
When you start flying, pay attention to composition. Use different altitudes and angles to create variety in your shots. Wide-angle overhead shots capture the entire property and surrounding neighborhood, while lower, closer angles highlight features like landscaping, driveways, or backyard spaces.
Maintain a steady speed when moving the drone. Sudden movements can blur images or disrupt the framing. Using the drone’s gimbal to stabilize the camera ensures each shot is crisp and professional.
Symmetry and balance are important. Align the drone to capture parallel lines, centered features, or natural focal points. This approach makes your photos visually appealing and easier to use in marketing materials.
Remember to shoot in RAW format whenever possible. RAW files retain more data than JPEGs, giving you greater flexibility in post-processing. This ensures you can adjust exposure, white balance, and colors without losing quality.
Real estate drone photography tips also emphasize varying perspectives. Combining wide shots, mid-range angles, and close-ups creates a comprehensive visual story that highlights the property’s unique features.
Post-Processing and Editing
Capturing the photo is only part of the process. Editing enhances colors, corrects exposure, and removes minor distractions. This step is critical for professional results and can dramatically improve how your images appear online.
Adjust brightness and contrast to make images pop. Correct white balance to reflect natural colors, especially for outdoor shots where sunlight can affect tones. Minor touch-ups, such as removing shadows, wires, or objects in the yard, help focus attention on the property itself.
Some photographers also create composite images. For example, combining multiple exposures can enhance dynamic range, showing both bright skies and shaded areas clearly. Adding subtle adjustments like vignetting or sharpening can give the final image a polished, professional look.
Editing is where real estate drone photography tips translate into a visual impact. Even the most beautifully captured shot benefits from careful post-processing to bring out its full potential.
Advanced Drone Shooting Techniques
To take your real estate drone photography tips to the next level, experiment with advanced techniques that create more engaging visuals. Using slow, cinematic movements enhances the storytelling of your property. Fly the drone in smooth arcs around key features like pools, patios, or front entrances to add a dynamic perspective that static shots cannot provide.
Incorporating altitude changes during flight adds depth to your images. For instance, start higher to capture the overall property layout, then gradually descend for detailed shots of landscaping, patios, or outdoor amenities. This layered approach helps buyers understand both the scale and quality of the property.
Orbiting the property can also produce impressive visuals. Flying in a circular path around the home while keeping the camera focused on the center creates a natural 360-degree view. This technique is ideal for showcasing large estates or properties with unique architecture.
Using HDR (High Dynamic Range) mode ensures that your drone captures bright skies and shaded areas simultaneously. This is especially useful in Phoenix, where desert sunlight can create strong contrasts. Proper HDR techniques prevent overexposed skies or underexposed shadows.
Choosing the Right Angles for Maximum Impact
Selecting angles is one of the most important aspects of drone photography. Front-facing shots of the property give a sense of approachability and curb appeal. Diagonal angles can reveal depth and architectural lines, while top-down perspectives show the full layout, including driveways, pools, and surrounding property.
Consider the environment surrounding the property. Including nearby parks, scenic views, or community amenities in the frame enhances the value perception for buyers. Avoid cluttered backgrounds that distract from the main focus of the property.
For multi-story homes, higher altitudes can emphasize roof lines, terraces, and gardens. Lower angles can highlight outdoor entertaining areas and pools. Balancing these perspectives ensures that every important feature is highlighted effectively.
Integrating Drone Shots into Real Estate Listings
Once captured and edited, drone images need to be presented strategically. Listings should start with a strong hero image typically an aerial shot that captures the property’s scale and outdoor features. The following images should show complementary angles, including interior photos and detailed outdoor shots.
Adding drone images to marketing materials such as brochures, social media posts, and email campaigns increases engagement. Buyers respond positively to aerial views, often sharing listings with others or requesting more information.
3D tours combined with aerial footage offer a fully immersive experience. Potential buyers can navigate the property online while understanding its layout and surroundings. This is particularly valuable for out-of-state buyers or luxury listings, where first impressions are critical.
Safety and Best Practices
Professional drone operators follow safety guidelines to protect both the property and the equipment. Always conduct pre-flight checks, including battery levels, propeller condition, and GPS connectivity. Avoid flying near power lines, trees, or other obstacles that could pose hazards.
Respect privacy and local laws. Do not fly over neighboring properties without permission, and stay informed about FAA regulations if operating in the United States. Using real estate drone photography tips responsibly protects your reputation and avoids legal complications.
Maximizing the Value of Your Drone Photography
High-quality drone photos are an investment. To get maximum value, combine them with professional editing. At aitinsider, we provide image enhancement services that elevate your aerial shots. We handle color correction, exposure adjustments, object removal, and sky replacements to ensure each photo looks flawless.
Drone images can also be used across multiple marketing channels. Listing websites, social media campaigns, printed brochures, and email newsletters all benefit from high-resolution aerial photos. By using these images effectively, you enhance your brand and improve the chances of attracting serious buyers.

Final Thoughts
Mastering real estate drone photography tips involves more than learning how to fly a drone. It includes preparation, choosing the right equipment, understanding lighting, capturing diverse angles, and post-processing to enhance visuals. Drones give you a unique perspective, but careful planning and professional editing turn these shots into compelling marketing tools.
By following these tips and investing in high-quality drone services, your listings will stand out in a competitive market. For professional image editing that complements your aerial photography, turn to aitinsider. Our team ensures your drone shots are polished, visually stunning, and ready to impress buyers. Combining technical skill, creative vision, and expert editing makes your real estate marketing powerful, professional, and effective.
How Much Does Drone Photography Cost For Real Estate In 2025?
[…] understand the real impact of drone photography, let’s look at examples where the cost translated into real […]